Post by Tim C on Feb 12, 2007 17:36:34 GMT
An excellent tutorial on painting Ork skin produced by Jabberwocky, this mini is the one he has painted for the Children In Need project.
Here is the summary of the steps I took to do my particular take on the Orks for the World of Minis charity project for Children in Need. I have never used the Citadel Paints, so I apologize in advance to those of you who will have to convert my paint scheme. For this particular project, I used Vallejo Model Colors (VMC) and Reaper Master Series (RMS).
The paints I used are:
VMC Black
VMC Flat Green
VMC SS Camo Bright Green
VMC Golden Olive
RMS Desert Sand
RMS Linen White
RMS Clear Plum
Step 1: Primer the mini
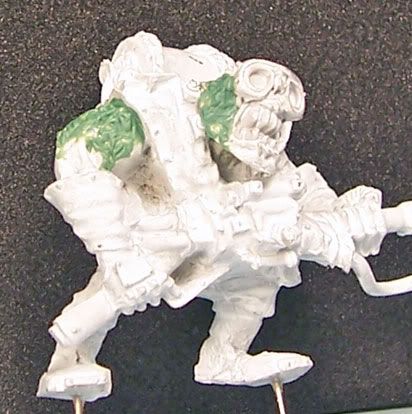
After prepping the mini, I primered him with Vallejo Game Color Brush-on Primer. It was the only thing I had available; I won’t argue the merits of white vs. black primering here. I have also added some greenstuff to simulate burned skin as well.
Step 2: Black undercoat
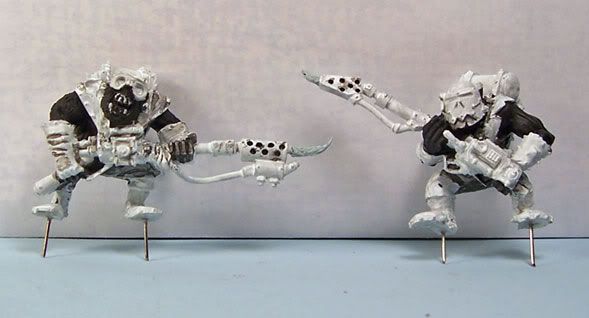
I undercoated the mini with VMC black, thinned 1:2 with water. Again, let’s not argue the merits of primering in black. Sure it would have saved a step, but who’s counting?
Step 3: Flat Green
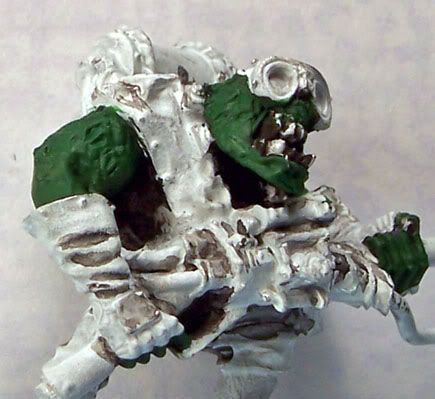
I have added a fairly thick layer of VMC Flat Green, again thinned to 1:2 with water. This will really become the shading tone for the ork.
Step 4: SS Camo Bright Green
Now I start to thin the paints more, going to 1:3 with water. I begin highlighting the upper portions of the arms and face with the VMC SS Camo Bright Green, layering it with the Flat Green as I move to the underside of the arms and face. This is really going to be the “basecoat”.
Step 5: Golden Olive
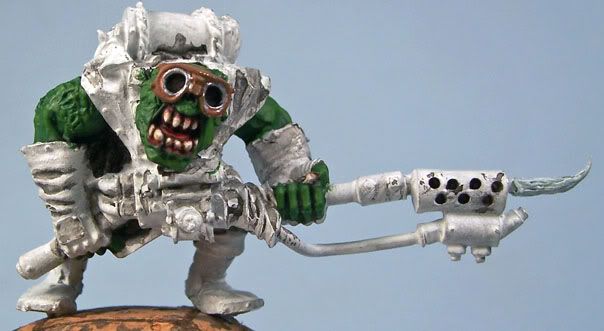
The true highlighting begins in earnest here. I have thinned the VMC Golden Olive to 1:4 with water and am selectively picking out the raised parts of the face, lips, hands, and upper arm musculature.
Step 6: Additional highlighting
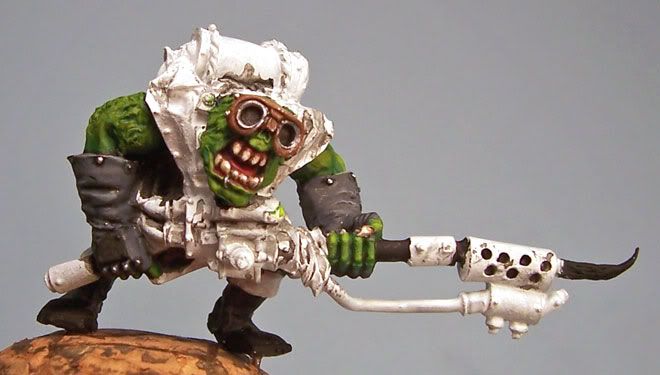
Here I am highlighting with two different colors to try and differentiate the burned skin on the right side of the body from the normal skin on the left. I have taken a mixture of 1:1 RMS Linen White: Golden Olive, thinned again to 1:4 or 1:5 with water. I am hitting the top of the ear, lip, knuckles, and a smaller area of the upper arm muscles. For the burned skin, I have mixed 1:1 Desert Sand to Golden Olive.
Step 7: Final Highlights
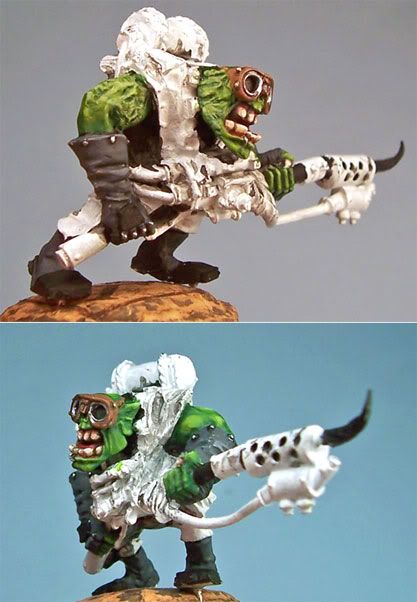
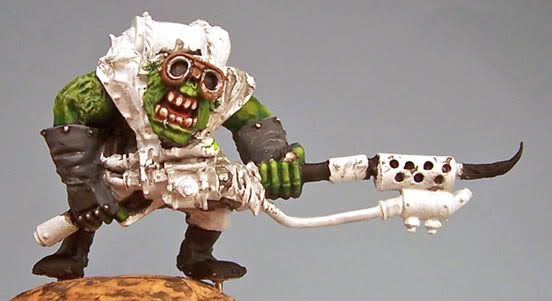
The last step is highlighting the very tip of the ear, a small area on the biceps muscle, and the protruding lower lip with a very thin layer of RMS Linen White. For the burned skin, I did a wash of RMS Clear Plum to help distinguish it from the non-burned skin and add a bit of contrast. Finally, I went over the skin selectively with a very thin wash (perhaps 1:10) of the SS Camo Bright Green, to try and smooth any transitions.
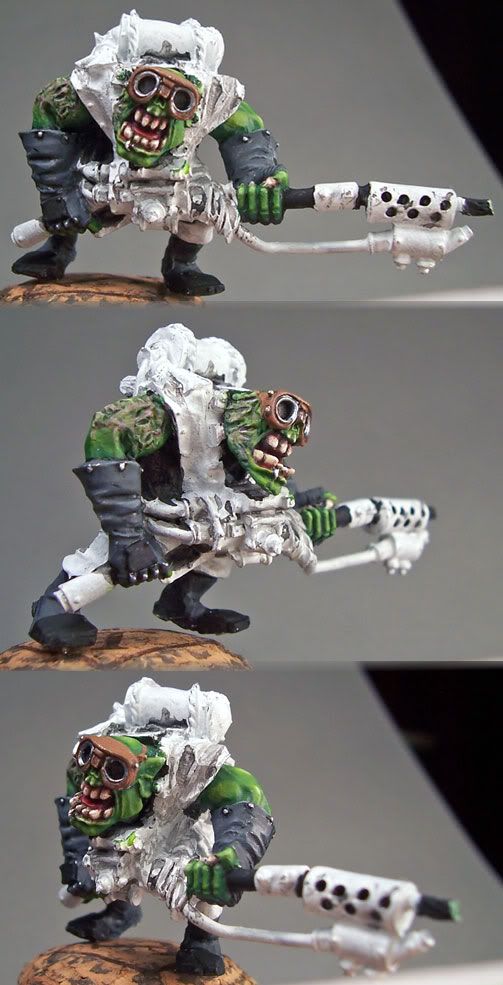
I hope you find this helpful!
Please take the time to comment. Thanks Jabber for a fantastic tutorial.
Here is the summary of the steps I took to do my particular take on the Orks for the World of Minis charity project for Children in Need. I have never used the Citadel Paints, so I apologize in advance to those of you who will have to convert my paint scheme. For this particular project, I used Vallejo Model Colors (VMC) and Reaper Master Series (RMS).
The paints I used are:
VMC Black
VMC Flat Green
VMC SS Camo Bright Green
VMC Golden Olive
RMS Desert Sand
RMS Linen White
RMS Clear Plum
Step 1: Primer the mini
After prepping the mini, I primered him with Vallejo Game Color Brush-on Primer. It was the only thing I had available; I won’t argue the merits of white vs. black primering here. I have also added some greenstuff to simulate burned skin as well.

Step 2: Black undercoat
I undercoated the mini with VMC black, thinned 1:2 with water. Again, let’s not argue the merits of primering in black. Sure it would have saved a step, but who’s counting?

Step 3: Flat Green
I have added a fairly thick layer of VMC Flat Green, again thinned to 1:2 with water. This will really become the shading tone for the ork.

Step 4: SS Camo Bright Green
Now I start to thin the paints more, going to 1:3 with water. I begin highlighting the upper portions of the arms and face with the VMC SS Camo Bright Green, layering it with the Flat Green as I move to the underside of the arms and face. This is really going to be the “basecoat”.

Step 5: Golden Olive
The true highlighting begins in earnest here. I have thinned the VMC Golden Olive to 1:4 with water and am selectively picking out the raised parts of the face, lips, hands, and upper arm musculature.

Step 6: Additional highlighting
Here I am highlighting with two different colors to try and differentiate the burned skin on the right side of the body from the normal skin on the left. I have taken a mixture of 1:1 RMS Linen White: Golden Olive, thinned again to 1:4 or 1:5 with water. I am hitting the top of the ear, lip, knuckles, and a smaller area of the upper arm muscles. For the burned skin, I have mixed 1:1 Desert Sand to Golden Olive.


Step 7: Final Highlights
The last step is highlighting the very tip of the ear, a small area on the biceps muscle, and the protruding lower lip with a very thin layer of RMS Linen White. For the burned skin, I did a wash of RMS Clear Plum to help distinguish it from the non-burned skin and add a bit of contrast. Finally, I went over the skin selectively with a very thin wash (perhaps 1:10) of the SS Camo Bright Green, to try and smooth any transitions.

I hope you find this helpful!
Please take the time to comment. Thanks Jabber for a fantastic tutorial.


