Post by suladan on Jul 2, 2006 13:34:36 GMT
Article Name: Painting Knights Of Dol Amroth
Description: A guide on how to paint the under rated Swan Knights Of Dol Amroth
Type: Technique
Complexity Beginner - Intermediate
Introduction
I have always liked the swan knights, despite their oversized helmets and swords. When well painted they look superb on the tabletop and give your Gondor force a bit of umph to help against those hard nut enemies like the Easterlings. In this article I will explain how I paint my Knights; I hope you find it helpful.
Preperation
First, as with all minis, you need to clean your mini. This means that you need to remove any mould lines or defects with a sharp knife. I don’t recommend using a file as that could ruin the mini. A sharp knife and a steady hand is all that’s needed. Next you need to glue the minis shield on (if you want to of course); I personally leave the shield off as it makes painting it much easier (I’ll show this in more detail later on).
Next you will need to prime the mini. For this i used Chaos Black spray primer, but you can use chaos black paint if you prefer.
Colors used:

Flesh
Next it’s on to the flesh. The only part of flesh on these guys is the face. I always like to start with the face, as if you make a good job of it, it inspires you to do a good job on the rest of the mini.
First, basecoat the flesh with Bestial Brown. This gives you a nice base to work off instead of black. Next, paint a coat of Dwarf Flesh over the face, leaving the deepest recesses (such as the eye sockets) when that is fully dry then gives the flesh a wash of Flesh Ink. Note the emphasis on the word fully, this is because the ink will take off any partially dry paint and spread it over the face, which isn’t good. I recommend leaving the ink for at least 10 minutes to fully dry. DO NOT use a hair dryer as this will make the ink flow into places you don’t want it to go. Once the ink is fully dry you can put a final highlight of elf flesh onto the highest parts such as the chin and nose. If you think you are good enough, you can attempt the eyes but they are very small on these minis so it’s best left as black shadow.

Armour
Next it’s on to the armour, which dominates the Swan Knights. First basecoat the armour with Boltgun Metal. When that is dry, give the armour a shading wash of Black Ink. This will flow into the deepest parts of the armour creating shadow. Next reset the base tone with Boltgun Metal leaving the deepest recesses. When that is dry, highlight the armour with Chainmail. When that is dry, highlight the armour with Mithril Silver, this should be put on the sharpest parts of the armour and the edges.

Clothing
Next it’s on to the white clothing. First basecoat in Codex Grey, I find that Codex Grey is better for this troop type than Bestial Brown as it gives a nice cool white finish. Next, add a little bit of Skull White for the next highlight, about 80:20 grey to white. Then keep adding more white for each successive highlight. I did about 5 layers before the final highlight of pure Skull White, but you can adjust this to your tastes. You can, if you want to, add a blue trim to the white skirt. But I went against this as I didn’t want to spoil what I had already done.

Sword And Scabbard
Next it’s the sword and scabbard. For the sword it’s the same as the armour but without the Black Ink wash. Basecoat of Boltgun Metal, highlight Chainmail and final highlight of Mithril Silver. The hilt is basecoated Shining Gold, then its given a shading wash of Flesh Wash. Then reset the basetone then highlight with a mix of 50:50 Shining Gold to Mithril Silver. The scabbard is basecoated Scorched Brown the highlighted with Bestial Brown.

Belt And Straps
The straps are basecoated with Scorched Brown then highlighted with Bestial Brown. Any buckles can be painted Boltgun Metal and highlighted with Mithril Silver.

Shield
Next it’s the shield, i highly recommend blu-tacking the shield to a sculpting tool or pencil as it makes painting it a lot easier.
Basecoat the empty area of the shield in a 50:50 mix of Chaos Black and Regal Blue. For the highlights keep adding Enchanted Blue for each successive highlight. I did 3 highlights so I got a dark shield but you can add more for a brighter shield. The markings on the shield are basecoated with Codex Grey then highlighted with Skull White. The metal banding is painted with a basecoat of Shining Gold then highlighted with a 50:50 mix of Shining Gold and Mithril Silver.


Basing
Now we can add scenic materials to the base to make it look realistic and exciting. For mine, I tore a bit of Cork Tile and glued that to the base. The parts of plastic left showing were covered in P.V.A. glue then dipped in Fine Sand.
The base was then basecoated in Chaos Black paint. The rock was drybrushed in codex grey then skull white. The sand was heavily drybrushed in Ccorched Brown, then a lighter drybrush of Bestial Brown, then Snakebite Leather, then a final drybrush of Bleached Bone. Static Grass was then added to the base.
Finished!
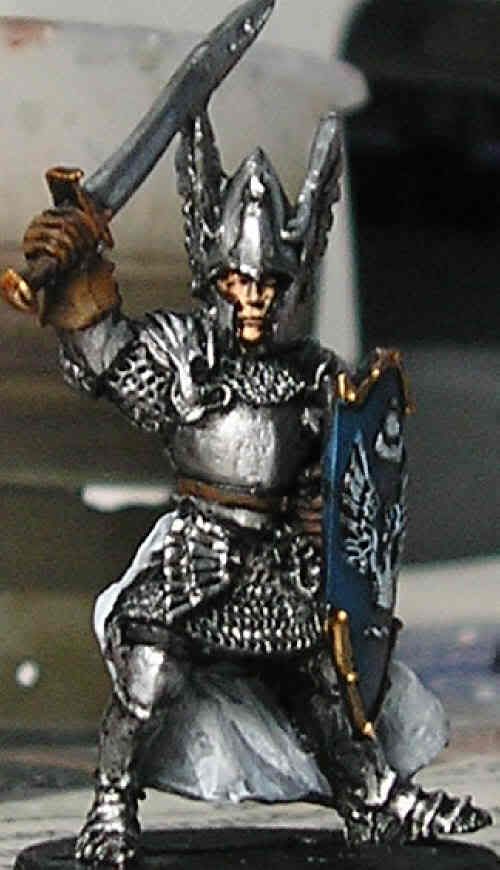
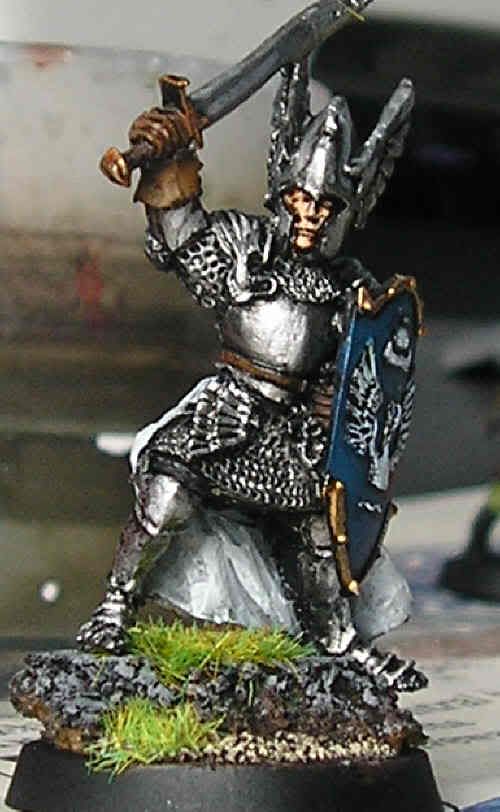
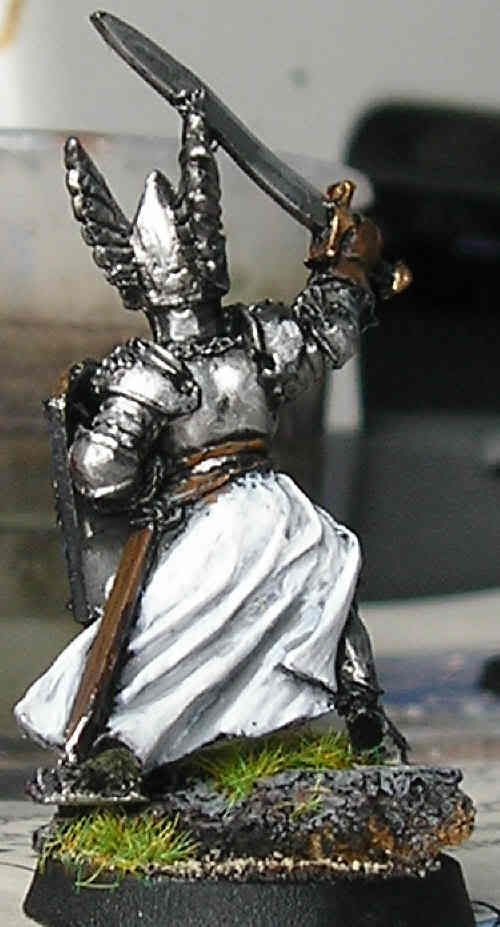
Now your Swan Knight is ready to face the forces of darkness. I will leave you with a few pics of the finished piece.


hope you enjoyed this article and find it useful next time you do some painting.
Description: A guide on how to paint the under rated Swan Knights Of Dol Amroth
Type: Technique
Complexity Beginner - Intermediate
Introduction
I have always liked the swan knights, despite their oversized helmets and swords. When well painted they look superb on the tabletop and give your Gondor force a bit of umph to help against those hard nut enemies like the Easterlings. In this article I will explain how I paint my Knights; I hope you find it helpful.

Preperation
First, as with all minis, you need to clean your mini. This means that you need to remove any mould lines or defects with a sharp knife. I don’t recommend using a file as that could ruin the mini. A sharp knife and a steady hand is all that’s needed. Next you need to glue the minis shield on (if you want to of course); I personally leave the shield off as it makes painting it much easier (I’ll show this in more detail later on).
Next you will need to prime the mini. For this i used Chaos Black spray primer, but you can use chaos black paint if you prefer.
Colors used:

Flesh
Next it’s on to the flesh. The only part of flesh on these guys is the face. I always like to start with the face, as if you make a good job of it, it inspires you to do a good job on the rest of the mini.
First, basecoat the flesh with Bestial Brown. This gives you a nice base to work off instead of black. Next, paint a coat of Dwarf Flesh over the face, leaving the deepest recesses (such as the eye sockets) when that is fully dry then gives the flesh a wash of Flesh Ink. Note the emphasis on the word fully, this is because the ink will take off any partially dry paint and spread it over the face, which isn’t good. I recommend leaving the ink for at least 10 minutes to fully dry. DO NOT use a hair dryer as this will make the ink flow into places you don’t want it to go. Once the ink is fully dry you can put a final highlight of elf flesh onto the highest parts such as the chin and nose. If you think you are good enough, you can attempt the eyes but they are very small on these minis so it’s best left as black shadow.


Armour
Next it’s on to the armour, which dominates the Swan Knights. First basecoat the armour with Boltgun Metal. When that is dry, give the armour a shading wash of Black Ink. This will flow into the deepest parts of the armour creating shadow. Next reset the base tone with Boltgun Metal leaving the deepest recesses. When that is dry, highlight the armour with Chainmail. When that is dry, highlight the armour with Mithril Silver, this should be put on the sharpest parts of the armour and the edges.

Clothing
Next it’s on to the white clothing. First basecoat in Codex Grey, I find that Codex Grey is better for this troop type than Bestial Brown as it gives a nice cool white finish. Next, add a little bit of Skull White for the next highlight, about 80:20 grey to white. Then keep adding more white for each successive highlight. I did about 5 layers before the final highlight of pure Skull White, but you can adjust this to your tastes. You can, if you want to, add a blue trim to the white skirt. But I went against this as I didn’t want to spoil what I had already done.


Sword And Scabbard
Next it’s the sword and scabbard. For the sword it’s the same as the armour but without the Black Ink wash. Basecoat of Boltgun Metal, highlight Chainmail and final highlight of Mithril Silver. The hilt is basecoated Shining Gold, then its given a shading wash of Flesh Wash. Then reset the basetone then highlight with a mix of 50:50 Shining Gold to Mithril Silver. The scabbard is basecoated Scorched Brown the highlighted with Bestial Brown.

Belt And Straps
The straps are basecoated with Scorched Brown then highlighted with Bestial Brown. Any buckles can be painted Boltgun Metal and highlighted with Mithril Silver.

Shield
Next it’s the shield, i highly recommend blu-tacking the shield to a sculpting tool or pencil as it makes painting it a lot easier.
Basecoat the empty area of the shield in a 50:50 mix of Chaos Black and Regal Blue. For the highlights keep adding Enchanted Blue for each successive highlight. I did 3 highlights so I got a dark shield but you can add more for a brighter shield. The markings on the shield are basecoated with Codex Grey then highlighted with Skull White. The metal banding is painted with a basecoat of Shining Gold then highlighted with a 50:50 mix of Shining Gold and Mithril Silver.


Basing
Now we can add scenic materials to the base to make it look realistic and exciting. For mine, I tore a bit of Cork Tile and glued that to the base. The parts of plastic left showing were covered in P.V.A. glue then dipped in Fine Sand.
The base was then basecoated in Chaos Black paint. The rock was drybrushed in codex grey then skull white. The sand was heavily drybrushed in Ccorched Brown, then a lighter drybrush of Bestial Brown, then Snakebite Leather, then a final drybrush of Bleached Bone. Static Grass was then added to the base.
Finished!
Now your Swan Knight is ready to face the forces of darkness. I will leave you with a few pics of the finished piece.


hope you enjoyed this article and find it useful next time you do some painting.


