Post by Tim C on Jun 14, 2006 17:46:51 GMT
I'd like to say a couple of things first before I get under way,
Firstly I'm going to start with the basics of how I hold the mini for painting and each step will have an image to show, hopefully the images will show each stage clearly enough. I think this will be of some use to some of you.
Secondly I will not be going through the basing of the miniature as this is going to end up on a diorama suffice to say that your usual basing methods are perfectly adequate.
Thirdly this guide hopefully will be of some use to painters of all levels and even more hopefully you will all get something out of it.
Ok here we go,
First up is the image of the items needed for the project,
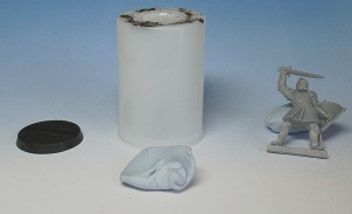
Here is a list off the paints used in this stage of the project.
Skull White
Chaos Black
Shadow Grey
Codex Grey
Ghostly Grey
Boltgun Metal
Chainmail
Mithril Silver
Black Ink
Red Gore
Elf Flesh
Dark Flesh
Dwarf Flesh
Testors Dullcoat (any matt varnish will suffice though)
Add to this the usual selection of paint brushes sizes 3/0, 4/0 and 5/0 and we are away. This mini is intended for a diorama and therefore the painting will be aimed at setting that standard, also it will not be attached to the slotta base when finished so it is only temporarily fixed on one to make holding it easier.
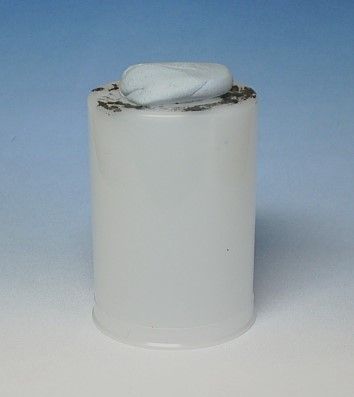
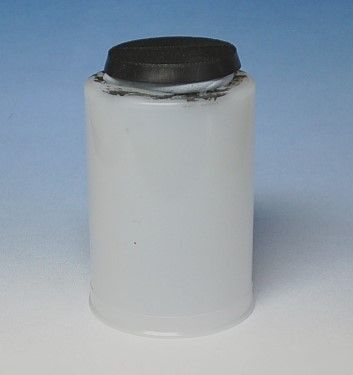
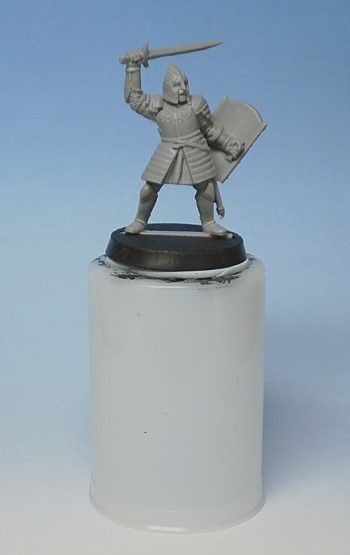
I've used a 35mm film case as the tool for actually holding the mini whilst painting and then placed blue tack on top and then pressed the slotta base and mini into the blue tack. If it is left for a while the tack will harden a little and will amply hold the mini. When it comes to removing the mini it is just a case of carefully taking it off the blue tack which is a relatively simple task.
Next up I undercoat the mini black I usually brush undercoat the LOTR minis especially the plastics as this gives more control over the amount of paint being applied and lessens the chance of flooding out the detail.
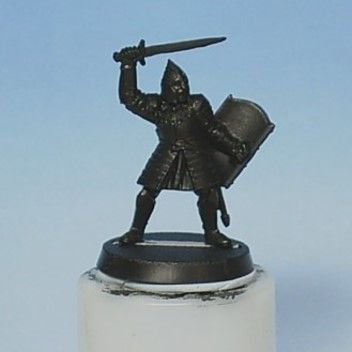
Now the mini is ready for painting proper so to speak. The face is the first detail to be tackled. Firstly basecoat the face with Ghostly Grey this covers black better than white and gives a good base for the skin tone, neatness is not necessary at this time.
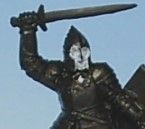
Then a 50/50 mix of Elf Flesh and Dwarf Flesh is applied, it may take two coats to get coverage, it should be noted at this time that the paints are kept thin (about the consistency of milk) this gives more control and a smoother finish.
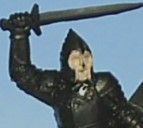
A wash of Dwarf Flesh is applied next. This needs to be very thin so as to flow into the recesses of the face and making the facial detail easier to pick out in the next step.
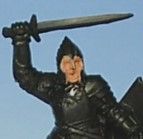
Deep shadows are created in the eye sockets and mouth and under the bottom lip with Dark Flesh, then highlights are created using Elf Flesh with a small amount of Dwarf Flesh mixed in. Because very little of the face is visible smooth blending is not an issue here.
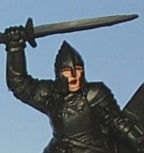
Now we retouch the areas caught by the skintones with black and then apply Boltgun Metal to the Helmet and Breastplate and Back Plate, I like to break the armour down into sections so I can watch the development and then if I don't like what I see I have less to alter later. I find it also helps to keep my concentration better and thus I tend not to rush what I am doing.
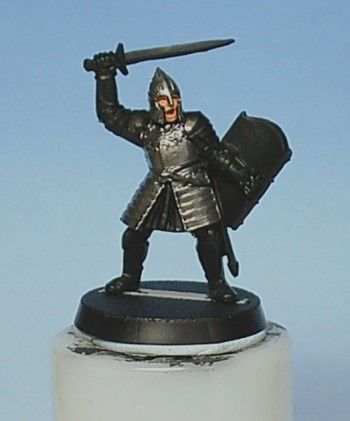
Next up is the shading coat, I use a wash of black ink for this being careful when shading the helmet not to catch the face. The same thing can be achieved by applying a very thin wash of black paint this has the advantage of having no shine when dry but as I am going to matt varnish later the ink does fine.
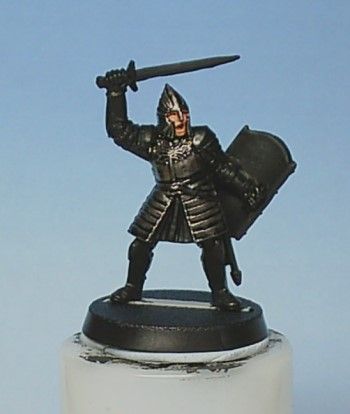
Now the mini is starting to take shape. This system would quite easily work with painting 4 or 5 models at a time as well as singularly which is the way I normally paint.
The next step is to start and highlight the metals, this should be treated exactly the same as highlighting normal colours working from the darker shade to the light, also (and this cannot be stressed enough) just like working with normal colours but even more so with metallic paints, the paint needs to be thin otherwise all you’ll end up with is a gloopy looking mess. Thinning metallic paint will make the metal flakes in the paint flow out more evenly and will give a much smoother finish.
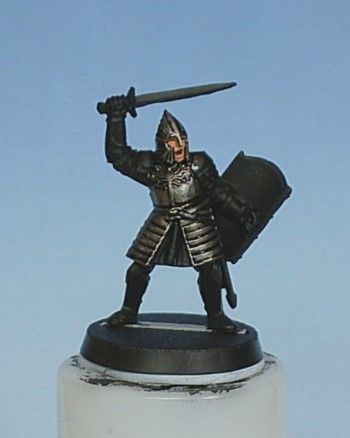
In the next three steps the pictures show how the metallic takes shape, firstly we go back over the areas if the armour with Boltgun Metal being careful to leave the black ink showing in the deepest recesses, the embossed Tree of the King on the breastplate is not touched at this time.
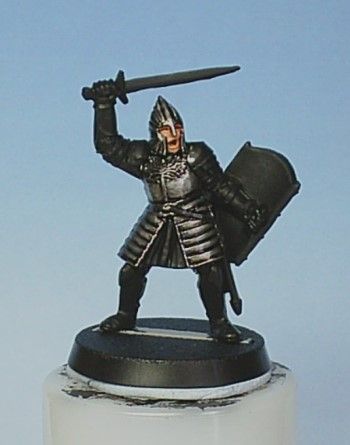
Then Chainmail is applied for the first highlight working more towards the higher points of the model’s armour, again the Tree of the King on the breastplate is not touched.
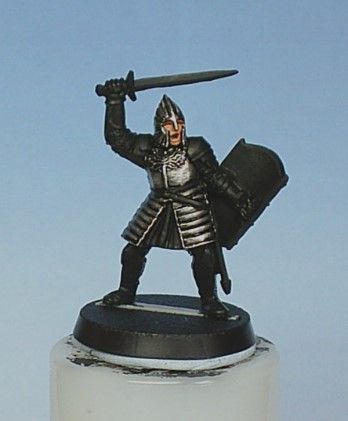
Lastly Mithril Silver is applied sparingly to the highest points and edges of the armour. Now we can very carefully do the embossed tree, for this I use a technique called over brushing, this is similar to dry brushing but when taking the paint off the brush with the tissue you need to leave a little more on than you do with dry brushing. Then very carefully and in ONE direction very lightly draw the brush over the tree this will leave the paint only on the tree and because you have not highlighted it in the previous stages will make it stand out more.
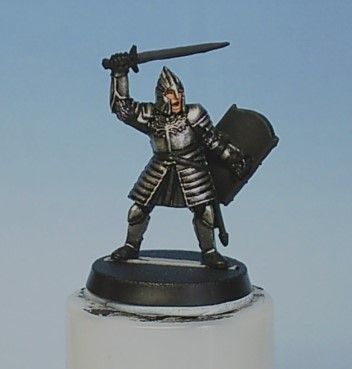
The rest of the armour is painted in exactly the same way and when complete looks like this.
Note also that the details left to paint like the belt straps, sword sheath, various areas of clothing and shield and boot straps have been re-picked out in black.
Next up we are going to tackle the areas of clothing, this is possibly one of the hardest colours (black that is) to highlight convincingly and to be honest if it goes right it is usually more luck than judgement. The technique I use is layering, I use lots of layers of very thin paint to “hopefully” get the effect I’m looking for. As with any painting style the paint needs to be thin about the consistency of milk maybe even a little thinner. The opacity of the paint when thin helps to make the transition in colour a lot smoother.
The colours we will be using for this are Chaos Black “obviously” and Codex Grey this will be added in very small amounts working up to pure codex grey for the final highlight. I won’t go into quantities as it is best to go for trial and error on this just suffice to say that you only need a very small amount of grey in each stage obviously as you progress from the deepest recesses to the highest points of the folds and ridges the amount of grey to black will alter being pure Codex Grey at the final stage. If it ends up looking to grey do not worry as we can remedy this (to a certain degree) with the final stage of the clothing highlights but more on that later. In the following images you will see the transition in the highlights (hopefully).
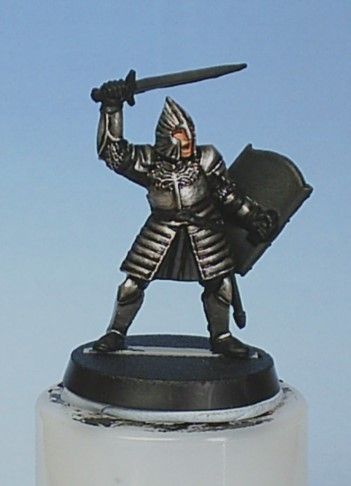
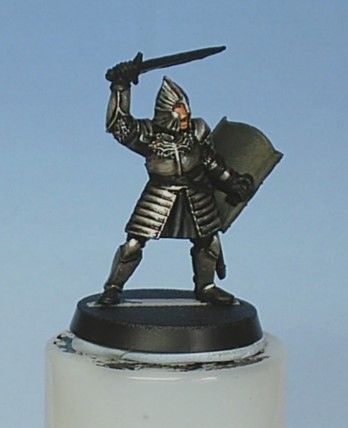
OK so now we have gotten our highlights where we want them, I always think that my highlights look too grey at this stage so I need to tone them down. To do this I use very thin glazes of black paint. The way I mix all my glazes is to use an eye dropper (you can get these from most chemists easy enough) and a size 3/0 brush.
Firstly take a small amount of black paint just a brush tips worth and place it on your palette, then take your eye dropper and add one drop of water to the paint and mix well in.
What you have in effect is dirty water, then take your brush try not to over load it with the mix and paint on this mix, you will not see any significant change straight away as it will take a few coverings to make a difference but it will make a difference after a few coats.
Lastly take a fine brush like a 4/0 and paint thinned down black paint into the deepest areas of the folds, this is known as deep shading. Now you should have a nice looking highlighted black for the clothing, as with anything practice will make perfect.
At this stage the boots gloves and inside of the shield have been given a basecoat of Scorched Brown (also the hair can be painted as well if you like) as well.
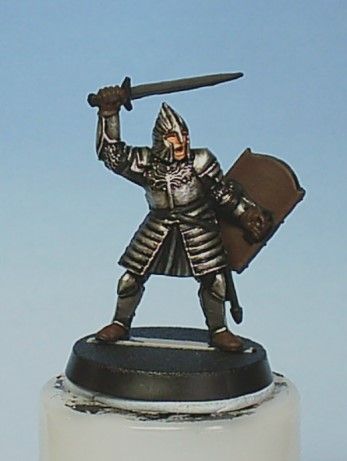
The next stage is to mix a 70/30 mix of Scorched Brown and Chaos Black and thin it well down, apply this to the boots and gloves and also the hair if you have done it this colour.
Take the same shading mix and very carefully paint thin lines down the length of the inside of the shield (try to keep the lines as straight as you can and also try to keep the distance apart as even as you can), this is to simulate the planking that would be there on the real thing.
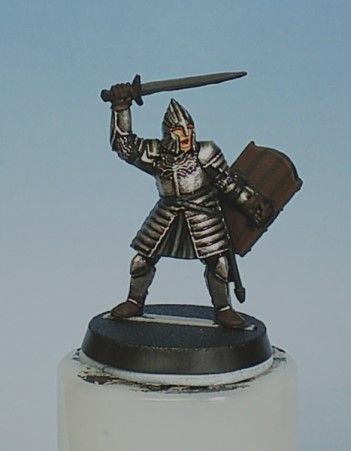
Next highlight the gloves, boots and hair with pure Scorched Brown, then again with Scorched Brown and Bestial Brown increasing towards pure Bestial Brown and finally adding pure Snakebite Leather to the highest parts of the hair and fingers of the gloves. Also if you like you can add graining to the inside of the shield using a very fine brush (5/0) with pure Bestial Brown and then pure Snakebite Leather.
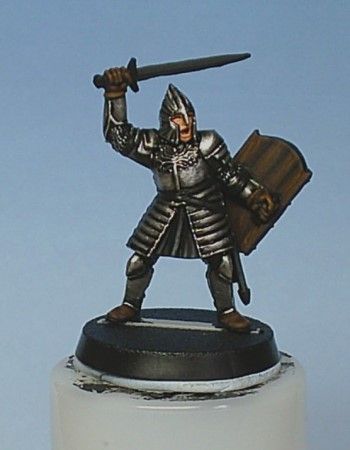
Now we paint the sword blade the edge of the shield and the shield design the metals are done exactly the same as described earlier the only difference being the shield design which is very carefully picked out with Mithril Silver. If any mistakes are made it can be easily tidied up with Chaos Black.
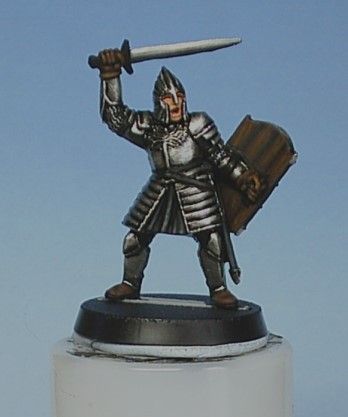
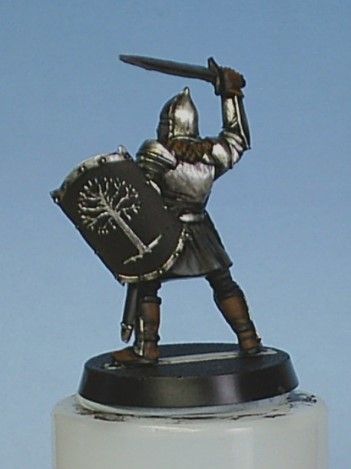
Now edge all the straps and belt with pure Shadow Grey with a very fine brush, again any mistakes can be touched up with Chaos Black at this time the sword hilt can now be painted first with a base of Tin Bitz, then with a highlight of Shining Gold, and then a final highlight of Shining Gold with a little Mithril Silver added to give the impression of tarnishing. Also at this stage you can add the teeth to the top of the mouth with a very thin line of Skull White and also paint the bottom lip with a mix of Elf Flesh and Red Gore give it a couple of coats of matt varnish and there you have your Warrior of Minas Tirith.
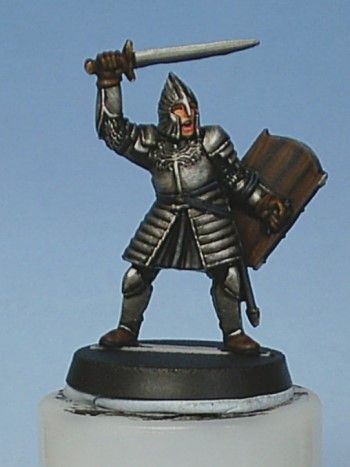
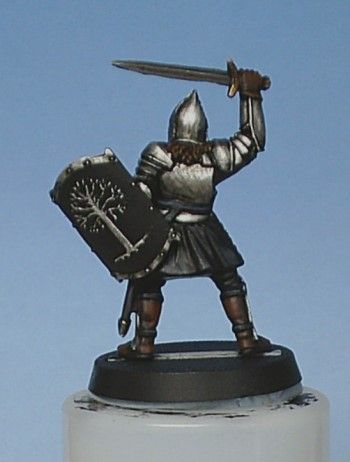
Now go and base your miniature in what ever way seems fit to you.
I hope that this is of some use to you all.
Cheers Tim.
Firstly I'm going to start with the basics of how I hold the mini for painting and each step will have an image to show, hopefully the images will show each stage clearly enough. I think this will be of some use to some of you.
Secondly I will not be going through the basing of the miniature as this is going to end up on a diorama suffice to say that your usual basing methods are perfectly adequate.
Thirdly this guide hopefully will be of some use to painters of all levels and even more hopefully you will all get something out of it.
Ok here we go,
First up is the image of the items needed for the project,

Here is a list off the paints used in this stage of the project.
Skull White
Chaos Black
Shadow Grey
Codex Grey
Ghostly Grey
Boltgun Metal
Chainmail
Mithril Silver
Black Ink
Red Gore
Elf Flesh
Dark Flesh
Dwarf Flesh
Testors Dullcoat (any matt varnish will suffice though)
Add to this the usual selection of paint brushes sizes 3/0, 4/0 and 5/0 and we are away. This mini is intended for a diorama and therefore the painting will be aimed at setting that standard, also it will not be attached to the slotta base when finished so it is only temporarily fixed on one to make holding it easier.


I've used a 35mm film case as the tool for actually holding the mini whilst painting and then placed blue tack on top and then pressed the slotta base and mini into the blue tack. If it is left for a while the tack will harden a little and will amply hold the mini. When it comes to removing the mini it is just a case of carefully taking it off the blue tack which is a relatively simple task.
Next up I undercoat the mini black I usually brush undercoat the LOTR minis especially the plastics as this gives more control over the amount of paint being applied and lessens the chance of flooding out the detail.

Now the mini is ready for painting proper so to speak. The face is the first detail to be tackled. Firstly basecoat the face with Ghostly Grey this covers black better than white and gives a good base for the skin tone, neatness is not necessary at this time.

Then a 50/50 mix of Elf Flesh and Dwarf Flesh is applied, it may take two coats to get coverage, it should be noted at this time that the paints are kept thin (about the consistency of milk) this gives more control and a smoother finish.

A wash of Dwarf Flesh is applied next. This needs to be very thin so as to flow into the recesses of the face and making the facial detail easier to pick out in the next step.

Deep shadows are created in the eye sockets and mouth and under the bottom lip with Dark Flesh, then highlights are created using Elf Flesh with a small amount of Dwarf Flesh mixed in. Because very little of the face is visible smooth blending is not an issue here.

Now we retouch the areas caught by the skintones with black and then apply Boltgun Metal to the Helmet and Breastplate and Back Plate, I like to break the armour down into sections so I can watch the development and then if I don't like what I see I have less to alter later. I find it also helps to keep my concentration better and thus I tend not to rush what I am doing.

Next up is the shading coat, I use a wash of black ink for this being careful when shading the helmet not to catch the face. The same thing can be achieved by applying a very thin wash of black paint this has the advantage of having no shine when dry but as I am going to matt varnish later the ink does fine.

Now the mini is starting to take shape. This system would quite easily work with painting 4 or 5 models at a time as well as singularly which is the way I normally paint.
The next step is to start and highlight the metals, this should be treated exactly the same as highlighting normal colours working from the darker shade to the light, also (and this cannot be stressed enough) just like working with normal colours but even more so with metallic paints, the paint needs to be thin otherwise all you’ll end up with is a gloopy looking mess. Thinning metallic paint will make the metal flakes in the paint flow out more evenly and will give a much smoother finish.
In the next three steps the pictures show how the metallic takes shape, firstly we go back over the areas if the armour with Boltgun Metal being careful to leave the black ink showing in the deepest recesses, the embossed Tree of the King on the breastplate is not touched at this time.

Then Chainmail is applied for the first highlight working more towards the higher points of the model’s armour, again the Tree of the King on the breastplate is not touched.

Lastly Mithril Silver is applied sparingly to the highest points and edges of the armour. Now we can very carefully do the embossed tree, for this I use a technique called over brushing, this is similar to dry brushing but when taking the paint off the brush with the tissue you need to leave a little more on than you do with dry brushing. Then very carefully and in ONE direction very lightly draw the brush over the tree this will leave the paint only on the tree and because you have not highlighted it in the previous stages will make it stand out more.

The rest of the armour is painted in exactly the same way and when complete looks like this.
Note also that the details left to paint like the belt straps, sword sheath, various areas of clothing and shield and boot straps have been re-picked out in black.

Next up we are going to tackle the areas of clothing, this is possibly one of the hardest colours (black that is) to highlight convincingly and to be honest if it goes right it is usually more luck than judgement. The technique I use is layering, I use lots of layers of very thin paint to “hopefully” get the effect I’m looking for. As with any painting style the paint needs to be thin about the consistency of milk maybe even a little thinner. The opacity of the paint when thin helps to make the transition in colour a lot smoother.
The colours we will be using for this are Chaos Black “obviously” and Codex Grey this will be added in very small amounts working up to pure codex grey for the final highlight. I won’t go into quantities as it is best to go for trial and error on this just suffice to say that you only need a very small amount of grey in each stage obviously as you progress from the deepest recesses to the highest points of the folds and ridges the amount of grey to black will alter being pure Codex Grey at the final stage. If it ends up looking to grey do not worry as we can remedy this (to a certain degree) with the final stage of the clothing highlights but more on that later. In the following images you will see the transition in the highlights (hopefully).


OK so now we have gotten our highlights where we want them, I always think that my highlights look too grey at this stage so I need to tone them down. To do this I use very thin glazes of black paint. The way I mix all my glazes is to use an eye dropper (you can get these from most chemists easy enough) and a size 3/0 brush.
Firstly take a small amount of black paint just a brush tips worth and place it on your palette, then take your eye dropper and add one drop of water to the paint and mix well in.
What you have in effect is dirty water, then take your brush try not to over load it with the mix and paint on this mix, you will not see any significant change straight away as it will take a few coverings to make a difference but it will make a difference after a few coats.
Lastly take a fine brush like a 4/0 and paint thinned down black paint into the deepest areas of the folds, this is known as deep shading. Now you should have a nice looking highlighted black for the clothing, as with anything practice will make perfect.
At this stage the boots gloves and inside of the shield have been given a basecoat of Scorched Brown (also the hair can be painted as well if you like) as well.

The next stage is to mix a 70/30 mix of Scorched Brown and Chaos Black and thin it well down, apply this to the boots and gloves and also the hair if you have done it this colour.
Take the same shading mix and very carefully paint thin lines down the length of the inside of the shield (try to keep the lines as straight as you can and also try to keep the distance apart as even as you can), this is to simulate the planking that would be there on the real thing.

Next highlight the gloves, boots and hair with pure Scorched Brown, then again with Scorched Brown and Bestial Brown increasing towards pure Bestial Brown and finally adding pure Snakebite Leather to the highest parts of the hair and fingers of the gloves. Also if you like you can add graining to the inside of the shield using a very fine brush (5/0) with pure Bestial Brown and then pure Snakebite Leather.

Now we paint the sword blade the edge of the shield and the shield design the metals are done exactly the same as described earlier the only difference being the shield design which is very carefully picked out with Mithril Silver. If any mistakes are made it can be easily tidied up with Chaos Black.


Now edge all the straps and belt with pure Shadow Grey with a very fine brush, again any mistakes can be touched up with Chaos Black at this time the sword hilt can now be painted first with a base of Tin Bitz, then with a highlight of Shining Gold, and then a final highlight of Shining Gold with a little Mithril Silver added to give the impression of tarnishing. Also at this stage you can add the teeth to the top of the mouth with a very thin line of Skull White and also paint the bottom lip with a mix of Elf Flesh and Red Gore give it a couple of coats of matt varnish and there you have your Warrior of Minas Tirith.


Now go and base your miniature in what ever way seems fit to you.
I hope that this is of some use to you all.
Cheers Tim.


