

Post by Tim C on Mar 26, 2007 8:03:11 GMT
Introduction[/u]
Hi all! This is the model that I have used for the One Ring Painting School Project, but I thought that I would also turn it into an article for every one to browse as and when they want too. This article is aimed at a more display standard than gaming but hey, if you want your Rohirrim to win on looks then paint them all this way (lol).
Painting the Horse[/u]
Materials Used[/u]
Resin Base (Optional)
Green Stuff
Polystyrene Cement
Skull White
Chaos Black
Codex Grey
Fortress Grey
Snakebite Leather
Bleached Bone
Scorched Brown
Dark Angels Green
Snot Green
Boltgun Metal
Mithril Silver
Tin Bitz
Brazen Brass
Shining Gold
Burnished Gold
Scab Red
Red Gore
Dwarf Flesh
Black Ink
Brown Ink
[/center]
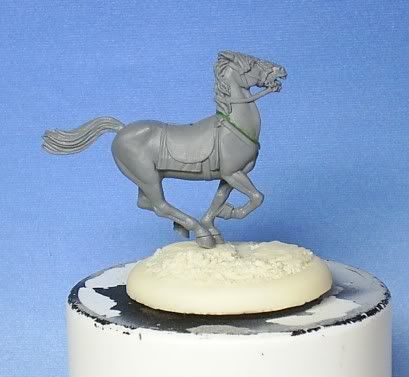
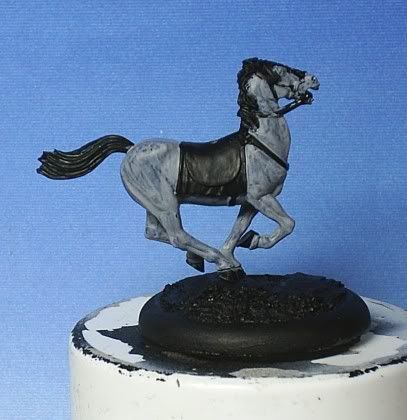
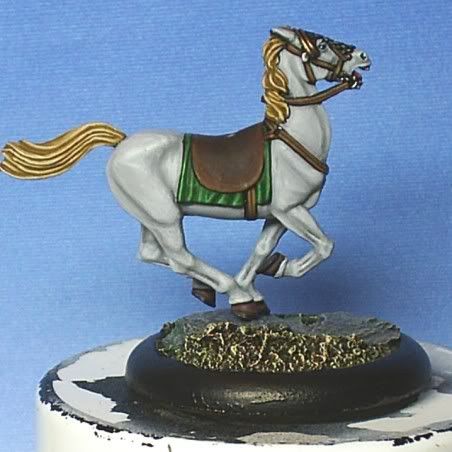
Firstly remove the horse from its sprue and clean off any mould lines. This is very important as a mould line left on can really ruin a finished model. Once you are happy with that then glue both halves together, attach it to its base and leave to dry. The horses fit together surprisingly well but there is one gap that needs a little attention and that is the gap where the neck meets the reins. So it is advisable to fill this with a little green stuff and allow to dry.
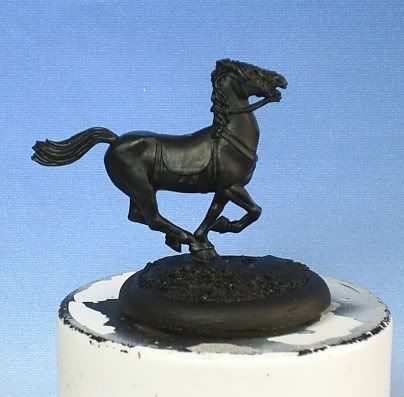
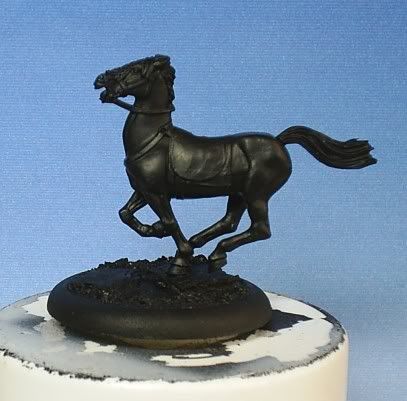
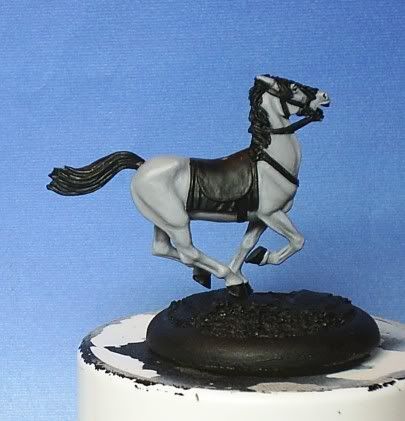
The next stage is to undercoat it, I use Chaos Black for this but white is just as good it is really just a case of what works best for you. For me that is black and so here we are the under coated mini.
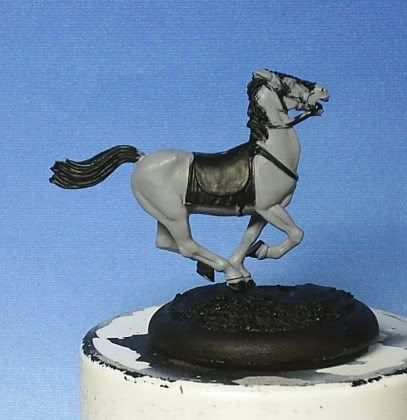
The basecoat is Fortress Grey. When painting any mini it is important to keep the paint thin, this makes the paint more opaque and coverage therefore is not quite as good. In the next picture you can see just how poorly the coverage can be and therefore is a perfect example of needing extra coats.
This takes longer but the end result is far smoother.
Here we are after a couple more layers of thin Fortress Grey.
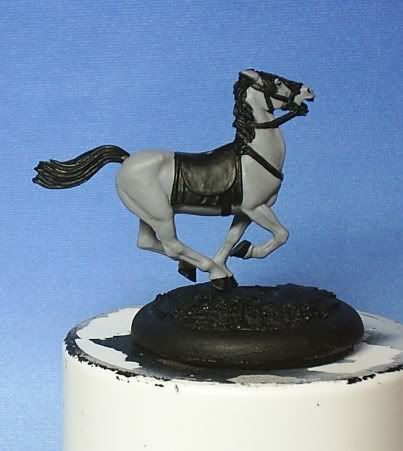
The next stage is to add a little shading. The finished horse is going to be a lot lighter than it is now so the shades don't need to be too dark. Also if any darker shades are needed these can be added later. To do this a little Codex Grey is mixed into the Fortress Grey, all we need to do is to darken it just a little and then water it down to the consistency of milk.
Paint this on evenly trying not to let it pool. The difference in colour on the model when dry is not that noticeable but trust me on this, by the time the horse flesh is finished it will look cool.

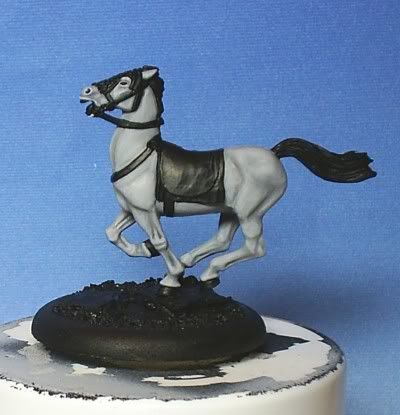
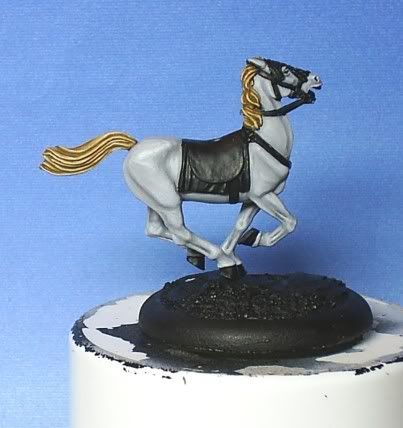
Now we reset the base coat of Fortress grey leaving the shade tone in the deeper area of the musculature of the horse. On this stage I have redone the areas that I don't want to be grey ie the bridle, saddle cloth and tail with Chaos Black. This is not necessary but it does make things easier when applying the highlights later on.
Now comes the highlighting of the horses skin. Remember to keep your paint thin as this will yield the best results. Handling very thin paint can be a bit tricky but with a little practice you should be able to get the hang of it. Also when using thin paint it can appear patchy. Give each stage time to dry properly and you will see that gradually the colour solidifies more to give a good even coverage.
Like anything in life it is just a matter of getting used to this way of working.
So here we go with the highlights, all we are going to do is simply add Skull White very gradually into Fortress Grey, a good way to look at the progression of how the colour is lightening is to mix each stage on your palette next to the previous one and compare the colours, there should only be a very gradual lightening of the colour,
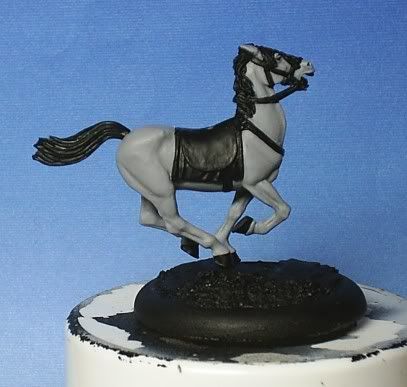
All we are basically doing is applying the highlights to the horse working up towards the highest parts of the muscle tone with a slightly lighter tone each time as we get higher up the musculature.
Remember to leave a little of each of the previous stages showing each time.

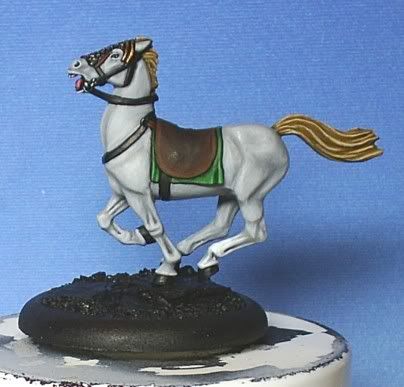
As you can see the horse is now really starting to take shape, on the bottom of one leg I have gone to pure Skull White to represent a sock, this just gives the horse a little individuality. If you are painting a lot of horses adding things like socks, flashes on the head and darker or lighter muzzles can really enhance the look. Also in some of the deeper recesses in the legs I have added a little deep shading to do this I mixed a little Codex Grey into the Fortress Grey and add it in with a very fine brush towards the bottom of the recesses.
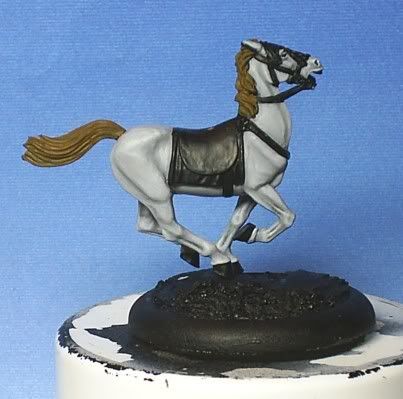
At this point I have also basecoated the main and tail. To do this I mixed up 1 part Codex Grey to 3 parts Snakebite Leather. You will need to do this a couple of times to get a good coverage.
to highlight this all I did was start to add increasing amounts of Bleached Bone to this mix and painted the highlights on following the lines of the hair on both the main and tail, if you don't feel comfortable enough to do this then a careful dry brush would also work well.
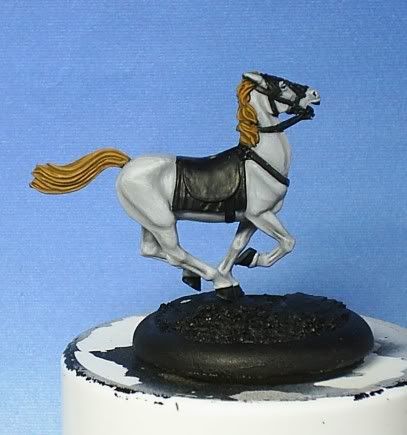
And then I simply carried on until I had pure Bleached Bone for the final highlights. I haven't but if you wanted to you could go further by adding Skull White to the Bone and then in very small amounts pure Skull White to give an impression of real shine in the hair.
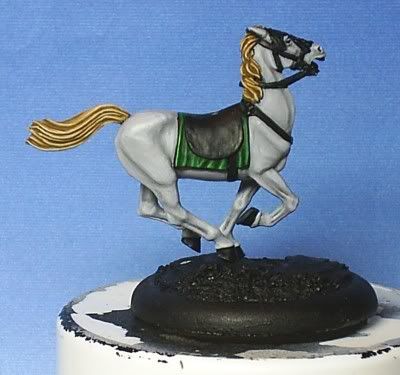
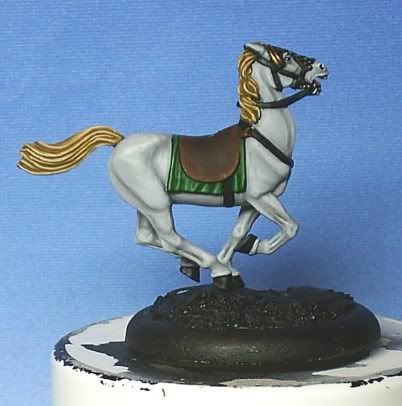
Now about the cloth that is under the saddle: a mix of roughly 50/50 Dark Angels Green and Snot Green was painted on first and then highlighted by adding more Snot Green to the Dark Angels Green until I had pure Snot Green. A final highlight of Snot Green with a little Bleached Bone in was painted on.
Note: I have not taken individual photos of each stage as I think you get the picture by now of how I am doing things.
Next the saddle area was done, we don't need to spend too much time on this as there is not alot of it seen with the rider on, I did check this beforehand. A mix of Scorched Brown and Chaos Black is put on fist making the Brown a bit darker than it is normally, and then simply add Scorched Brown into the mix until you have pure Scorched Brown. Work the highlights outwards towards the edge of the saddle as you get progressively lighter. Then add Bestial Brown into the Scorched Brown until you have pure Bestial, and that is that.
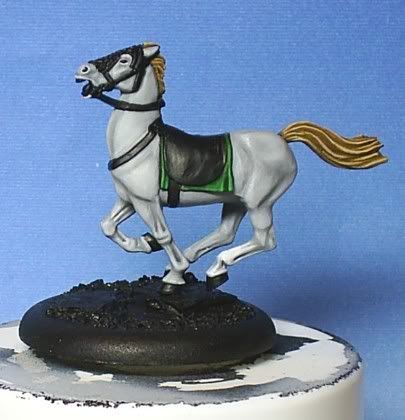
At this point I painted the edging of the horses head dress in Scorched Brown and highlighted once with Bestial Brown and finally with Bestial Brown with a little Bleached Bone added.
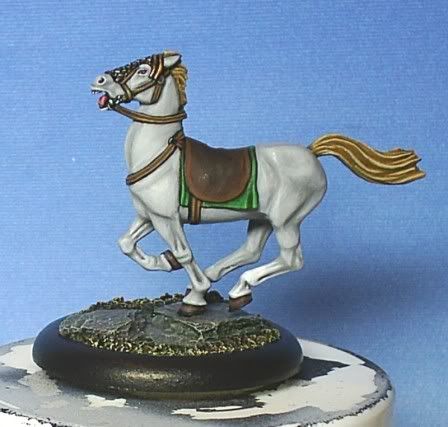
The scale mail part was basecoated with Boltgun Metal. When this was dry I mixed 1 part Brown Ink to 3 parts Black Ink to 1 part water. Paint this over the Boltgun Metal base coat let dry and then repeat and let dry again. Once this has dried get a fine brush and pick out the individual segments again with Boltgun Metal leaving the ink showing in the recesses. Highlight the edges of this with Mithril Silver. You may need to tidy up the top part of the head gear again with Chaos Black.
Then we can paint the cross section at the top, I base coated this in Tin Bitz, this is purely to give the next coats a good base if you don't have it don't worry as it is not essential.
Once dry take Brazen Brass and paint the cross sections trying to leave a black line inbetween the two sections. Highlight again working from the center of the head dress down towards the lower part on each side with Shining Gold and then again with Burnished Gold. Just a small highlight of Burnished Gold with a touch of Mithril Silver was finally added at the center . You may need to paint a thin line of thin Chaos Black inbetween the two sections to redefine them.
The reason I painted that part this way is that light would naturally fall on the very top of the head of the horse. Therefore the metal would appear much brighter there.
Now we turn our attention to the mouth. First I did the teeth, there are two ways to go about this depending on how confident you are and how steady your hand is.
The Easy Method
Base coat the teeth with Scorched Brown. Then paint a line over this with Bleached Bone leaving the basecoat showing at the base of the teeth. Finally paint a thinner line of Skull White at the top edge.
The Not So Easy Method
As before base coat the teeth Scorched Brown. Take a very fine brush and pick out the individual teeth with Bleached Bone. Again with a fine brush pick out the top of each of the teeth with Skull White. I did mine this way and it is not easy, but it looks great when done.
The tongue is basecoated Scab Red and then given another coat with Red Gore. Highlight the tongue by mixing in Dwarf Flesh and painting on leaving a little of the darker colour showing in the middle of the tongue. Do this about four times increasing the amount of Dwarf Flesh in the mix until you have a pinky looking colour.
Paint the eyes as you would normally, black then white and then black again for the pupils. Horses eyes are not white but I tried to do a more realistic look and it didn't look right probably because the eyes are so small on the mini.
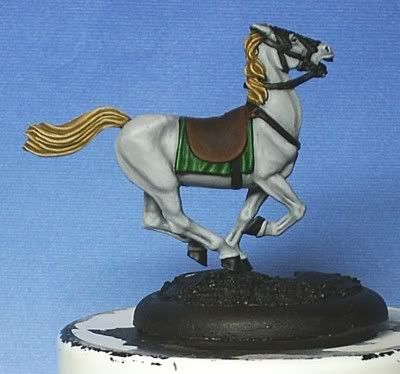
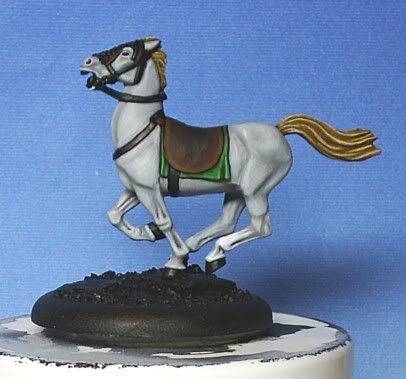
At this stage I also painted the metal on the bridle with Boltgun Metal finishing it with a Mithril Silver highlight. The reins, halter and girth strap are about all that is left to do now on the horse. This is actually very simple, basecoat Scorched Brown and then with a very fine brush highlight first along the edges of the straps with Bestial Brown. Then again with Snakebite Leather and finally to finish add a little Bleached Bone into the snake bite leather.
If you didn't make a very neat job (like me) you can always re-paint the Scorched Brown in between your highlights again with a very fine brush. This does take a little practice and a lot of patience but I think the end result is worth it.
I have done the base on mine and I am not going into basing here as we all have our own ideas on the best way to base miniatures. Basing is a very personal thing and therefore is best left to the individual to decide how best to go about it.
Painting The Rider[/u]
Materials Used[/u]
Boltgun Metal
Chainmail
Mithril Silver
Black Ink
Brown Ink
Washing Up Liquid (the stuff you wash the dishes with)
Chaos Black
Catachan Green
Bleached Bone
Scab Red
Bronzed Flesh
Bestial Brown
Snakebite Leather
Scorched Brown
Tin Bitz
Shining Gold
Burnished Gold
Dark Angels Green
Snot Green
Shadow Grey
Skull White
[/center]
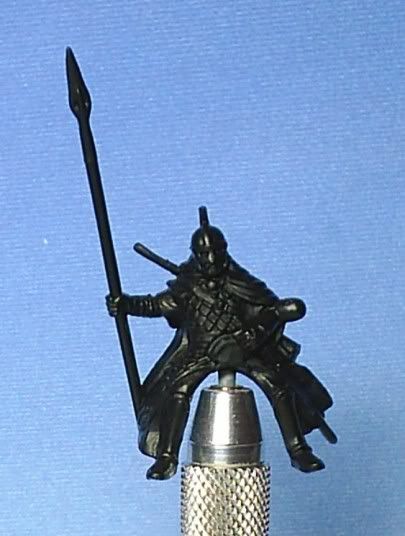
Now that is the horse finished, we can now turn our attention to the rider. After cleaning the mould lines off the mini I then place it in a pin vice to make it easier to handle. A pin vice is a very useful tool and probably the most useful tool you will ever own. If you haven't got one I suggest you get one as it is money well spent.
All I have done at this stage is undercoat the rider Chaos Black.
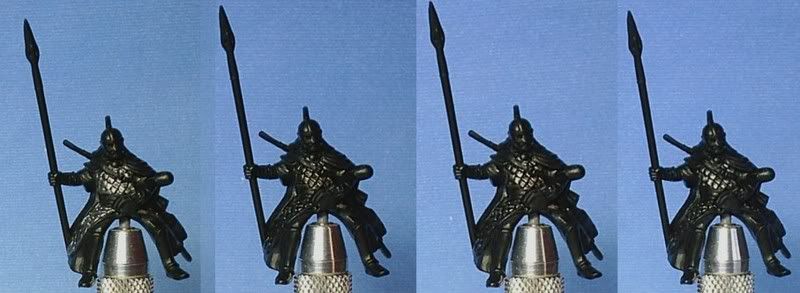
Firstly I painted Boltgun Metal all over the mail as a base coat. Then I mixed Black and Brown Inks together (slightly more Black than Brown) and added the tiniest amount of washing up liquid to this. I literally just let the tip of the brush pick up a dot of the stuff and added it too the ink and mixed it in and then watered the mixture down a little. What this does, if you have not tried this before, is breaking the surface tension of the mix. This in return lets the ink flow into the recesses better and not pool on the flat surfaces as the mix cannot retain its surface tension.
Once this had dried I painted the highlights by going through three stages, first Boltgun Metal again, then Chain Mail and then Mithril Silver. This to me looked a little bright when it was done so to finish I used washes of Chaos Black heavily thinned down with water. The mix ratio was roughly one part Black to about 30 parts water. I did this by using an eye dropper and all I did was take my brush and pick a little Black on the tip of the brush, placed this on my palette and then with an eye dropper placed three drops of water over the top of the Black and mixed it in. What you have in effect then is actually nothing more than dirty water. I then applied this in washes until I was happy. The effect is slow to show up as when each wash is dry the build up of colour is very subtle but patience is a virtue with this method and it forms a big part of how I paint metallic paints.
The first area I tackled on the rider after the mail was the pants. These I base coated Catachan Green, I find this colour has very poor covering power so I did a couple of coats to get a good solid covering, if you are a bit more organised than I was you can do the sleeve of the arm holding the spear at this point too. To highlight I just added Bleached bone to the base colour for a couple of stages.
The next part was the leather undergarment. Basecoat this in Scorched Brown, when dry mix some Chaos Black into the Brown and apply as a shade. To highlight this simply reapply Scorched Brown and then Scorched Brown with a little Bleached Bone added, you could if you don't like the look change the Bone for Bestial Brown.
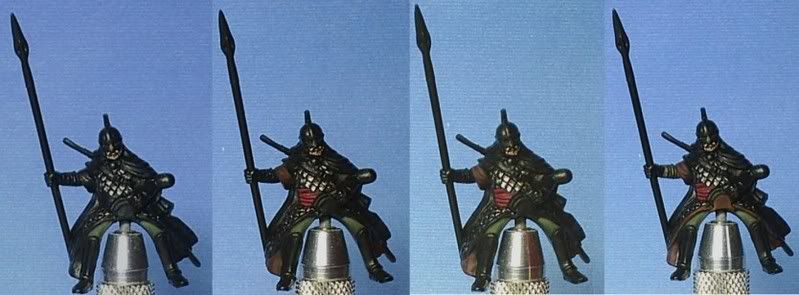
The sash was simply done by using Scab Red as the base colour and then highlighted by adding Bronzed Flesh in increasing amounts to the red. Paint the highlights on the raised areas of the folds of the sash, also try to make the highlights look brighter closer to the riders belly and darker towards the cloak as that gives a more realistic effect.
Paint the edge of the mail Scorched Brown and also the saddle, highlight first with Bestial Brown and then with Snakebite Leather. Now we are really motoring along now and it won't be too long before the mini is pretty much done.
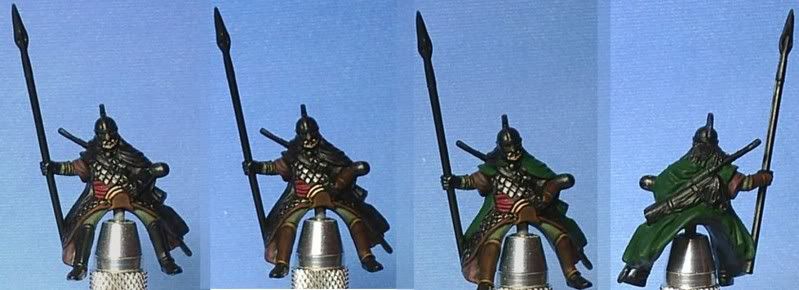
The greaves or lower leg armour and the fore arm armoured sections are next. Basecoat these with Scorched Brown. Then add some Chaos Black to this, water down a little and then apply as a shading wash. Allow this to dry thoroughly and then start to highlight back up with Scorched Brown and then start adding Bestial Brown in to this and highlight to taste. I went all the way to Bestial Brown on mine.
The Edging was done with first a coat of Snakebite Leather, this was then highlighted by adding Bleached Bone until I got a shade I was happy with. The metal trim to the saddle was given a base coat of Tin Bitz and then Shining Gold was painted on trying to leave the separation in between the two metal struts. I added a small amount of Mithril Silver to the Gold and gave a final highlight to this. I have to admit that I made a bit of a mess here and had to divide the metal parts with a bit of black lining done with thinned Chaos Black.
The cloak was base coated with a couple of coats of Dark Angels Green. I added a little Chaos Black to this and thinned it a little and applied this as a shading wash. The first highlights were reset with Dark Angels Green and then I started adding Snot Green to this for successive highlights until I had pure Snot Green. The final highlight stage was Snot Green with just a little Bleached Bone added and applied to the very highest points of the cloak.
For the helmet the same stages were done as for the saddle.
For the last bits and pieces of the model I will just go over briefly the way they were done as the methods have been covered before. The gloves, sword sheath and any other black areas were painted in Chaos Black and then just a small amount of Shadow Grey was added to a couple of highlight stages, this gave a nice subtle look to the black.
The rider's hair was painted exactly the same as the main and tail of his mount. The bow and bow strap were base coated Scorched Brown and highlighted by adding a little Bestial Brown to finish.
And now finally onto the last parts! I started with the spear on this mini, I always do the metal parts of spears first (that is just the way I do it and there is no real reason for it). The spear was basecoated with Boltgun Metal and then washed in black ink, this was then redefined with Boltgun Metal when dry and extreme highlights picked out with Mithril Silver. Any Buckles or other metal parts not previously covered are done at this time as well.
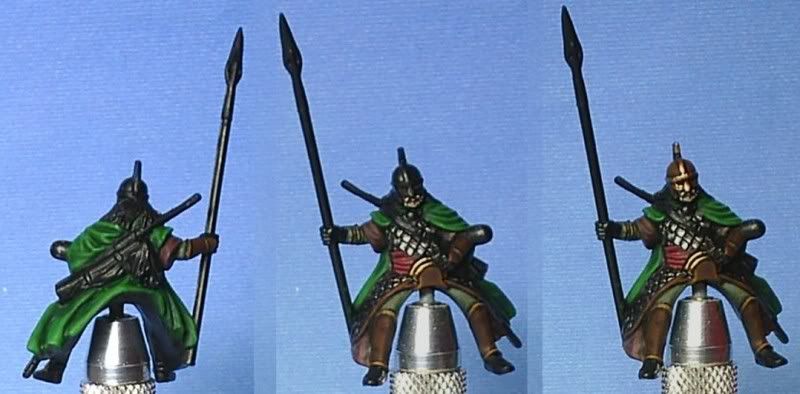
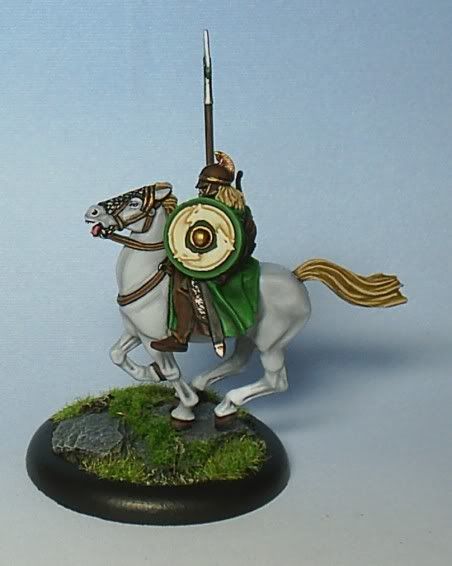
The shield is actually a key part of these models. I did the back of the shield first. I painted that while not attached to the model. I gave it a basecoat of Scorched Brown and then just picked out the relief first with Bestial Brown, followed with some Snakebite Leather. Finally at the edges of the shield I added a little Bleached Bone into the Snakebite Leather and added that as a final highlight. Once that was done I fixed the shield onto the rider.
Dark Angles Green was the base colour for the front of the shield. This was highlighted towards the edge of the mini by adding Snot Green until I was using pure Snot Green. On the very edge I added Snot Green with a touch of Bleached Bone to finish it off.
The horse relief on the shield was basecoated with Bleach Bone with a smidge of Snakebite Leather mixed in. The highlights were built up to pure Bleached Bone and then a final highlight of Bleached bone with a touch of Skull White was added to finish the relief.
The shield boss was base coated with Tin Bitz and had a first highlight of Brazen Brass. Then Shining Gold was added and a touch of Burnished Gold to finish. Then I watered down a little Snakebite Leather and applied thin glazes in a couple of places to give detail.
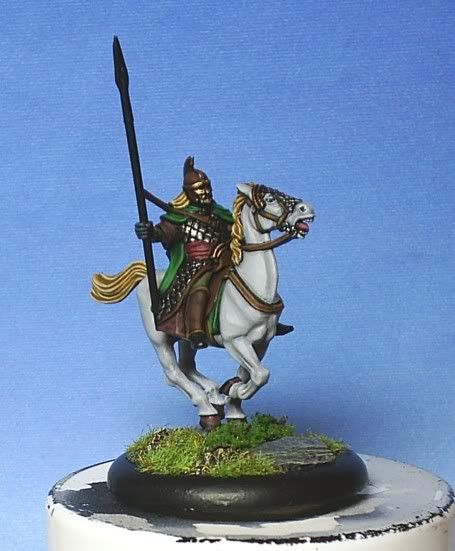
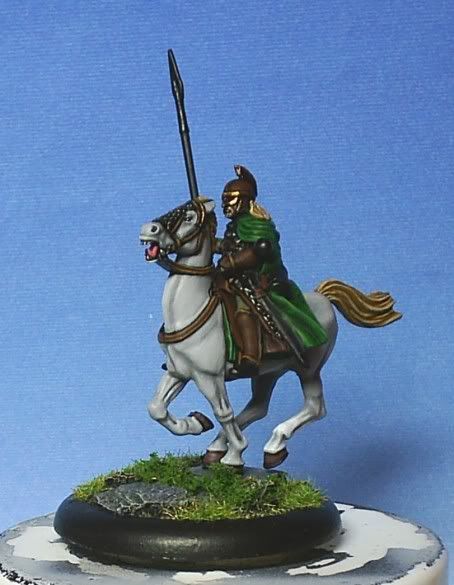
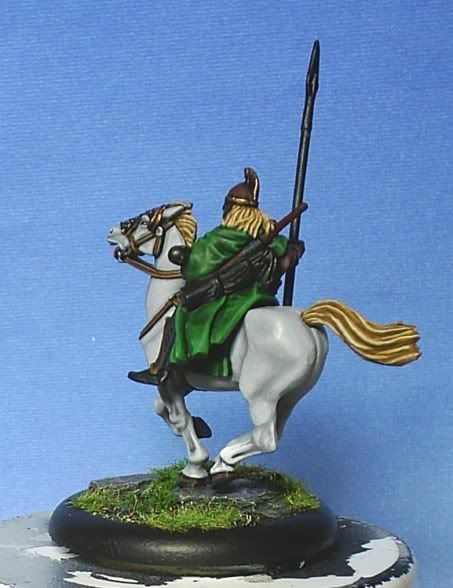
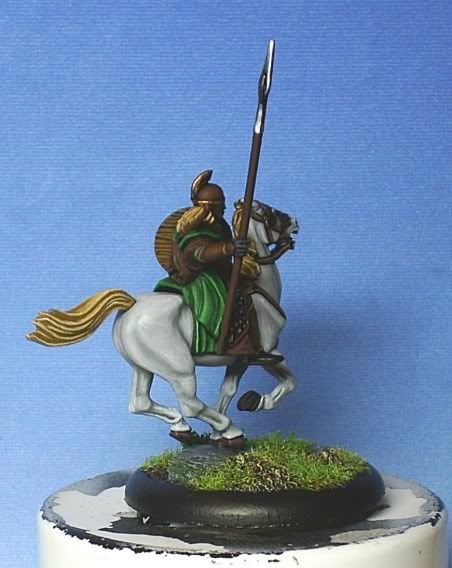
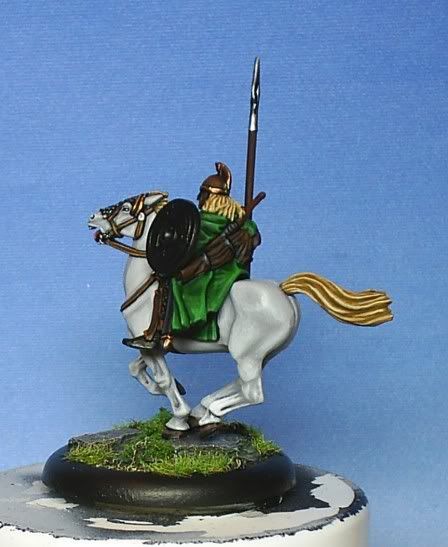
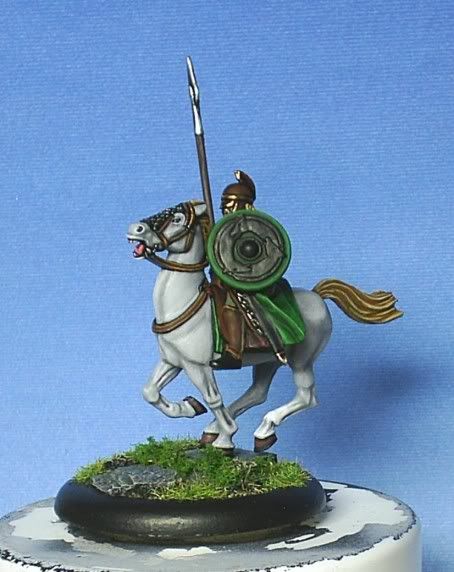
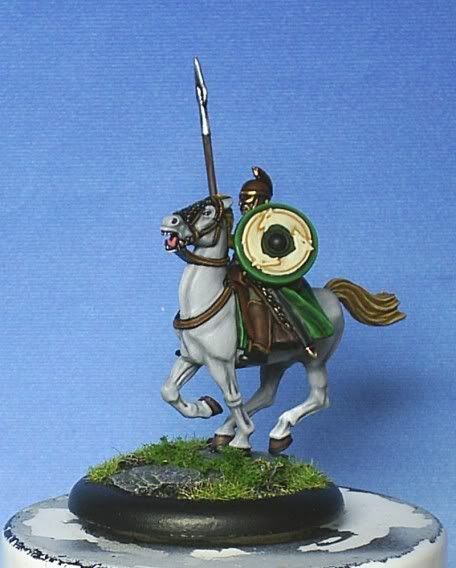
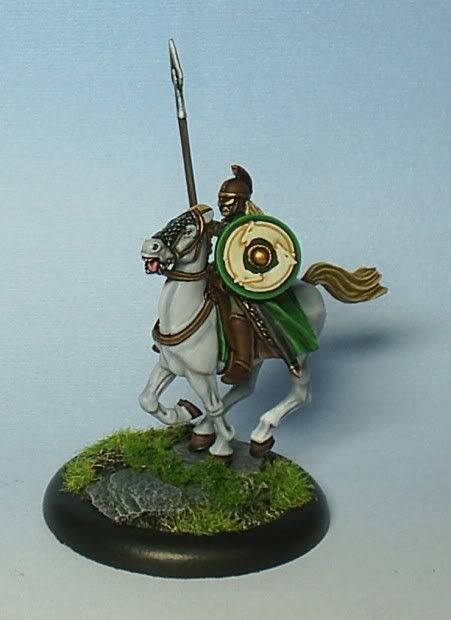
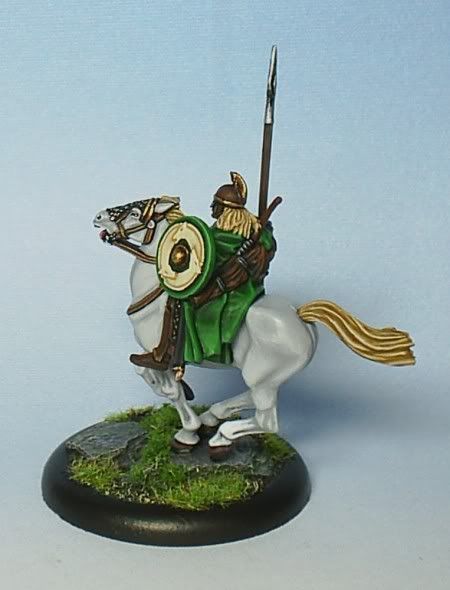
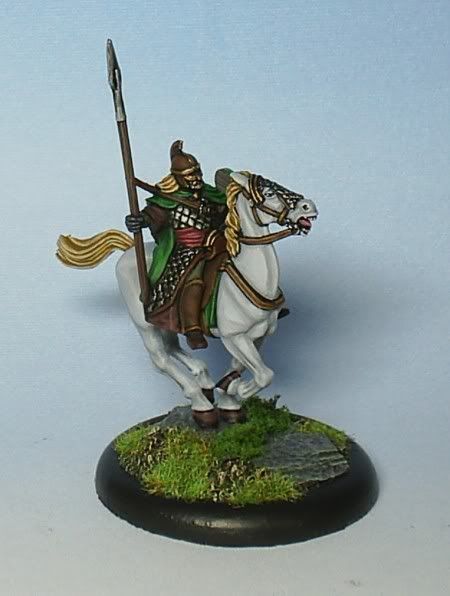
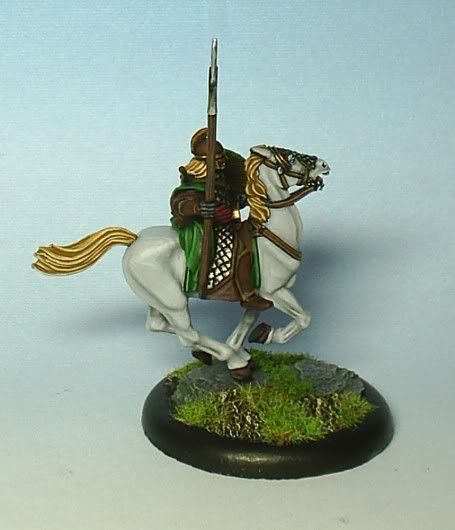
And here is your finished Rider of Rohan, ready to rush into your battlefields!
I hope you have enjoyed this article and that it will give you some use in the future.
Thanks for taking the time to read it.
Hi all! This is the model that I have used for the One Ring Painting School Project, but I thought that I would also turn it into an article for every one to browse as and when they want too. This article is aimed at a more display standard than gaming but hey, if you want your Rohirrim to win on looks then paint them all this way (lol).
Painting the Horse[/u]
Materials Used
Resin Base (Optional)
Green Stuff
Polystyrene Cement
Skull White
Chaos Black
Codex Grey
Fortress Grey
Snakebite Leather
Bleached Bone
Scorched Brown
Dark Angels Green
Snot Green
Boltgun Metal
Mithril Silver
Tin Bitz
Brazen Brass
Shining Gold
Burnished Gold
Scab Red
Red Gore
Dwarf Flesh
Black Ink
Brown Ink
[/center]
Firstly remove the horse from its sprue and clean off any mould lines. This is very important as a mould line left on can really ruin a finished model. Once you are happy with that then glue both halves together, attach it to its base and leave to dry. The horses fit together surprisingly well but there is one gap that needs a little attention and that is the gap where the neck meets the reins. So it is advisable to fill this with a little green stuff and allow to dry.
The next stage is to undercoat it, I use Chaos Black for this but white is just as good it is really just a case of what works best for you. For me that is black and so here we are the under coated mini.
The basecoat is Fortress Grey. When painting any mini it is important to keep the paint thin, this makes the paint more opaque and coverage therefore is not quite as good. In the next picture you can see just how poorly the coverage can be and therefore is a perfect example of needing extra coats.
This takes longer but the end result is far smoother.
Here we are after a couple more layers of thin Fortress Grey.
The next stage is to add a little shading. The finished horse is going to be a lot lighter than it is now so the shades don't need to be too dark. Also if any darker shades are needed these can be added later. To do this a little Codex Grey is mixed into the Fortress Grey, all we need to do is to darken it just a little and then water it down to the consistency of milk.
Paint this on evenly trying not to let it pool. The difference in colour on the model when dry is not that noticeable but trust me on this, by the time the horse flesh is finished it will look cool.
Now we reset the base coat of Fortress grey leaving the shade tone in the deeper area of the musculature of the horse. On this stage I have redone the areas that I don't want to be grey ie the bridle, saddle cloth and tail with Chaos Black. This is not necessary but it does make things easier when applying the highlights later on.
Now comes the highlighting of the horses skin. Remember to keep your paint thin as this will yield the best results. Handling very thin paint can be a bit tricky but with a little practice you should be able to get the hang of it. Also when using thin paint it can appear patchy. Give each stage time to dry properly and you will see that gradually the colour solidifies more to give a good even coverage.
Like anything in life it is just a matter of getting used to this way of working.
So here we go with the highlights, all we are going to do is simply add Skull White very gradually into Fortress Grey, a good way to look at the progression of how the colour is lightening is to mix each stage on your palette next to the previous one and compare the colours, there should only be a very gradual lightening of the colour,
All we are basically doing is applying the highlights to the horse working up towards the highest parts of the muscle tone with a slightly lighter tone each time as we get higher up the musculature.
Remember to leave a little of each of the previous stages showing each time.
As you can see the horse is now really starting to take shape, on the bottom of one leg I have gone to pure Skull White to represent a sock, this just gives the horse a little individuality. If you are painting a lot of horses adding things like socks, flashes on the head and darker or lighter muzzles can really enhance the look. Also in some of the deeper recesses in the legs I have added a little deep shading to do this I mixed a little Codex Grey into the Fortress Grey and add it in with a very fine brush towards the bottom of the recesses.
At this point I have also basecoated the main and tail. To do this I mixed up 1 part Codex Grey to 3 parts Snakebite Leather. You will need to do this a couple of times to get a good coverage.
to highlight this all I did was start to add increasing amounts of Bleached Bone to this mix and painted the highlights on following the lines of the hair on both the main and tail, if you don't feel comfortable enough to do this then a careful dry brush would also work well.
And then I simply carried on until I had pure Bleached Bone for the final highlights. I haven't but if you wanted to you could go further by adding Skull White to the Bone and then in very small amounts pure Skull White to give an impression of real shine in the hair.
Now about the cloth that is under the saddle: a mix of roughly 50/50 Dark Angels Green and Snot Green was painted on first and then highlighted by adding more Snot Green to the Dark Angels Green until I had pure Snot Green. A final highlight of Snot Green with a little Bleached Bone in was painted on.
Note: I have not taken individual photos of each stage as I think you get the picture by now of how I am doing things.
Next the saddle area was done, we don't need to spend too much time on this as there is not alot of it seen with the rider on, I did check this beforehand. A mix of Scorched Brown and Chaos Black is put on fist making the Brown a bit darker than it is normally, and then simply add Scorched Brown into the mix until you have pure Scorched Brown. Work the highlights outwards towards the edge of the saddle as you get progressively lighter. Then add Bestial Brown into the Scorched Brown until you have pure Bestial, and that is that.
At this point I painted the edging of the horses head dress in Scorched Brown and highlighted once with Bestial Brown and finally with Bestial Brown with a little Bleached Bone added.
The scale mail part was basecoated with Boltgun Metal. When this was dry I mixed 1 part Brown Ink to 3 parts Black Ink to 1 part water. Paint this over the Boltgun Metal base coat let dry and then repeat and let dry again. Once this has dried get a fine brush and pick out the individual segments again with Boltgun Metal leaving the ink showing in the recesses. Highlight the edges of this with Mithril Silver. You may need to tidy up the top part of the head gear again with Chaos Black.
Then we can paint the cross section at the top, I base coated this in Tin Bitz, this is purely to give the next coats a good base if you don't have it don't worry as it is not essential.
Once dry take Brazen Brass and paint the cross sections trying to leave a black line inbetween the two sections. Highlight again working from the center of the head dress down towards the lower part on each side with Shining Gold and then again with Burnished Gold. Just a small highlight of Burnished Gold with a touch of Mithril Silver was finally added at the center . You may need to paint a thin line of thin Chaos Black inbetween the two sections to redefine them.
The reason I painted that part this way is that light would naturally fall on the very top of the head of the horse. Therefore the metal would appear much brighter there.
Now we turn our attention to the mouth. First I did the teeth, there are two ways to go about this depending on how confident you are and how steady your hand is.
The Easy Method
Base coat the teeth with Scorched Brown. Then paint a line over this with Bleached Bone leaving the basecoat showing at the base of the teeth. Finally paint a thinner line of Skull White at the top edge.
The Not So Easy Method
As before base coat the teeth Scorched Brown. Take a very fine brush and pick out the individual teeth with Bleached Bone. Again with a fine brush pick out the top of each of the teeth with Skull White. I did mine this way and it is not easy, but it looks great when done.
The tongue is basecoated Scab Red and then given another coat with Red Gore. Highlight the tongue by mixing in Dwarf Flesh and painting on leaving a little of the darker colour showing in the middle of the tongue. Do this about four times increasing the amount of Dwarf Flesh in the mix until you have a pinky looking colour.
Paint the eyes as you would normally, black then white and then black again for the pupils. Horses eyes are not white but I tried to do a more realistic look and it didn't look right probably because the eyes are so small on the mini.
At this stage I also painted the metal on the bridle with Boltgun Metal finishing it with a Mithril Silver highlight. The reins, halter and girth strap are about all that is left to do now on the horse. This is actually very simple, basecoat Scorched Brown and then with a very fine brush highlight first along the edges of the straps with Bestial Brown. Then again with Snakebite Leather and finally to finish add a little Bleached Bone into the snake bite leather.
If you didn't make a very neat job (like me) you can always re-paint the Scorched Brown in between your highlights again with a very fine brush. This does take a little practice and a lot of patience but I think the end result is worth it.
I have done the base on mine and I am not going into basing here as we all have our own ideas on the best way to base miniatures. Basing is a very personal thing and therefore is best left to the individual to decide how best to go about it.
Painting The Rider[/u]
Materials Used
Boltgun Metal
Chainmail
Mithril Silver
Black Ink
Brown Ink
Washing Up Liquid (the stuff you wash the dishes with)
Chaos Black
Catachan Green
Bleached Bone
Scab Red
Bronzed Flesh
Bestial Brown
Snakebite Leather
Scorched Brown
Tin Bitz
Shining Gold
Burnished Gold
Dark Angels Green
Snot Green
Shadow Grey
Skull White
[/center]
Now that is the horse finished, we can now turn our attention to the rider. After cleaning the mould lines off the mini I then place it in a pin vice to make it easier to handle. A pin vice is a very useful tool and probably the most useful tool you will ever own. If you haven't got one I suggest you get one as it is money well spent.
All I have done at this stage is undercoat the rider Chaos Black.
Firstly I painted Boltgun Metal all over the mail as a base coat. Then I mixed Black and Brown Inks together (slightly more Black than Brown) and added the tiniest amount of washing up liquid to this. I literally just let the tip of the brush pick up a dot of the stuff and added it too the ink and mixed it in and then watered the mixture down a little. What this does, if you have not tried this before, is breaking the surface tension of the mix. This in return lets the ink flow into the recesses better and not pool on the flat surfaces as the mix cannot retain its surface tension.
Once this had dried I painted the highlights by going through three stages, first Boltgun Metal again, then Chain Mail and then Mithril Silver. This to me looked a little bright when it was done so to finish I used washes of Chaos Black heavily thinned down with water. The mix ratio was roughly one part Black to about 30 parts water. I did this by using an eye dropper and all I did was take my brush and pick a little Black on the tip of the brush, placed this on my palette and then with an eye dropper placed three drops of water over the top of the Black and mixed it in. What you have in effect then is actually nothing more than dirty water. I then applied this in washes until I was happy. The effect is slow to show up as when each wash is dry the build up of colour is very subtle but patience is a virtue with this method and it forms a big part of how I paint metallic paints.
The first area I tackled on the rider after the mail was the pants. These I base coated Catachan Green, I find this colour has very poor covering power so I did a couple of coats to get a good solid covering, if you are a bit more organised than I was you can do the sleeve of the arm holding the spear at this point too. To highlight I just added Bleached bone to the base colour for a couple of stages.
The next part was the leather undergarment. Basecoat this in Scorched Brown, when dry mix some Chaos Black into the Brown and apply as a shade. To highlight this simply reapply Scorched Brown and then Scorched Brown with a little Bleached Bone added, you could if you don't like the look change the Bone for Bestial Brown.
The sash was simply done by using Scab Red as the base colour and then highlighted by adding Bronzed Flesh in increasing amounts to the red. Paint the highlights on the raised areas of the folds of the sash, also try to make the highlights look brighter closer to the riders belly and darker towards the cloak as that gives a more realistic effect.
Paint the edge of the mail Scorched Brown and also the saddle, highlight first with Bestial Brown and then with Snakebite Leather. Now we are really motoring along now and it won't be too long before the mini is pretty much done.
The greaves or lower leg armour and the fore arm armoured sections are next. Basecoat these with Scorched Brown. Then add some Chaos Black to this, water down a little and then apply as a shading wash. Allow this to dry thoroughly and then start to highlight back up with Scorched Brown and then start adding Bestial Brown in to this and highlight to taste. I went all the way to Bestial Brown on mine.
The Edging was done with first a coat of Snakebite Leather, this was then highlighted by adding Bleached Bone until I got a shade I was happy with. The metal trim to the saddle was given a base coat of Tin Bitz and then Shining Gold was painted on trying to leave the separation in between the two metal struts. I added a small amount of Mithril Silver to the Gold and gave a final highlight to this. I have to admit that I made a bit of a mess here and had to divide the metal parts with a bit of black lining done with thinned Chaos Black.
The cloak was base coated with a couple of coats of Dark Angels Green. I added a little Chaos Black to this and thinned it a little and applied this as a shading wash. The first highlights were reset with Dark Angels Green and then I started adding Snot Green to this for successive highlights until I had pure Snot Green. The final highlight stage was Snot Green with just a little Bleached Bone added and applied to the very highest points of the cloak.
For the helmet the same stages were done as for the saddle.
For the last bits and pieces of the model I will just go over briefly the way they were done as the methods have been covered before. The gloves, sword sheath and any other black areas were painted in Chaos Black and then just a small amount of Shadow Grey was added to a couple of highlight stages, this gave a nice subtle look to the black.
The rider's hair was painted exactly the same as the main and tail of his mount. The bow and bow strap were base coated Scorched Brown and highlighted by adding a little Bestial Brown to finish.
And now finally onto the last parts! I started with the spear on this mini, I always do the metal parts of spears first (that is just the way I do it and there is no real reason for it). The spear was basecoated with Boltgun Metal and then washed in black ink, this was then redefined with Boltgun Metal when dry and extreme highlights picked out with Mithril Silver. Any Buckles or other metal parts not previously covered are done at this time as well.
The shield is actually a key part of these models. I did the back of the shield first. I painted that while not attached to the model. I gave it a basecoat of Scorched Brown and then just picked out the relief first with Bestial Brown, followed with some Snakebite Leather. Finally at the edges of the shield I added a little Bleached Bone into the Snakebite Leather and added that as a final highlight. Once that was done I fixed the shield onto the rider.
Dark Angles Green was the base colour for the front of the shield. This was highlighted towards the edge of the mini by adding Snot Green until I was using pure Snot Green. On the very edge I added Snot Green with a touch of Bleached Bone to finish it off.
The horse relief on the shield was basecoated with Bleach Bone with a smidge of Snakebite Leather mixed in. The highlights were built up to pure Bleached Bone and then a final highlight of Bleached bone with a touch of Skull White was added to finish the relief.
The shield boss was base coated with Tin Bitz and had a first highlight of Brazen Brass. Then Shining Gold was added and a touch of Burnished Gold to finish. Then I watered down a little Snakebite Leather and applied thin glazes in a couple of places to give detail.
And here is your finished Rider of Rohan, ready to rush into your battlefields!
I hope you have enjoyed this article and that it will give you some use in the future.
Thanks for taking the time to read it.
 )
)